Productivv

IT | CLOUD | RELIABLE

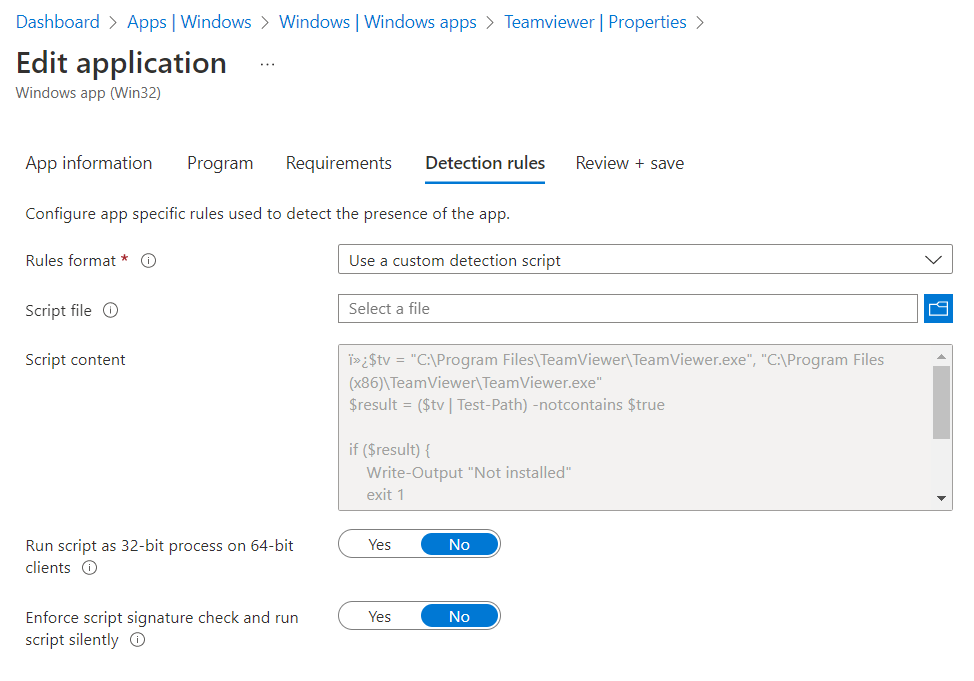
Intune – Use a custom detection script

Because of old installations, TeamViewer is sometimes installed in the 64 bit version and sometimes in the 32 bit version. Since I would like to have a clear overview in Intune, I created the script below.

$tv = "C:\Program Files\TeamViewer\TeamViewer.exe", "C:\Program Files (x86)\TeamViewer\TeamViewer.exe"
$result = ($tv | Test-Path) -notcontains $true

if ($result) {
    Write-Output "Not installed"
    exit 1
}
else {
    write-output "Teamviewer detected, exiting"
    exit 0
}
teamviewer detection script intune

Expand virtual disk of Azure SQL Virtual Machine

Expand a virtual disk of Azure SQL Virtual Machine in the Azure Portal.

Expanding of the disk can be done online.

  1. Go to the Azure Portal
  2. Search for “SQL virtual machines”
  1. Select your SQL virtual machine
  2. In the menu, select “Storage Configuration”
  1. Configure the data disk you want to expand
  1. Select the disk of the size where you want to expand the existing disk with
    • For example 1, your disk is currently 128Gib and you want to extend it to 256Gib, choose the 128Gib disk
    • For example 2, you disk is currently 256Gib and you want to extend it to 768Gib, choose the 512Gib disk
  1. That’s is, you don’t have to do anything in the OS

Configure Cisco AnyConnect with SAML (Azure)

Configure Cisco AnyConnect on Cisco Meraki MX firewall with SAML authentication from Azure

AZURE

  1. Log in to Azure Portal and select Azure Active Directoryazureportal
  2. Select “Enterprise Applications”
    enterprise applications
  3. New Application
    newapplication
  4. In the Add from the gallery section, type AnyConnect in the search box, select Cisco AnyConnect from the results panel, and then add the app. 
  5. Single Sign On
  6. SAML
    saml
  7. Edit Section 1
    section1
    1. Identifier (Entity ID)  – https://firewallname-qpjgjhmpdh.dynamic-m.com/saml/sp/metadata/SAML 
    2. Reply URL (Assertion Consumer Service URL) – https://firewallname-qpjgjhmpdh.dynamic-m.com/saml/sp/acs
  8. SAML Signing Certificate, Download Federation Metadata XML filecode

CISCO MERAKI

  1. Go to your Network
  2. Select “Security & SD-WAN” => Configure => Client VPN
  3. Second tab “AnyConnect Settings”
    1. Enabled
    2. Leave the default AnyConnect Port to 443
    3. Authentication Type => SAMLsaml
    4. AnnyConnect Server URL, same as the hostname but with “https://”annyconnectserverurl
    5. Upload the Federation Metadata XML file from step 8 in the previous sectionsdf

ASIGN USERS / GROUP

  1. Choose left in the menu for “Users and groups” => Add usersdf
  2. Select “Users and groups”
  3. Assign

Resources

AnyConnect Authentication Methods – Cisco Meraki

AnyConnect Azure AD SAML Configuration – Cisco Meraki